Kubernetes on ARM64 with kubeadm and Hetzner Cloud


There are some tools like k3s out there that make it possible to bootstrap a Kubernetes cluster on arm64 machines. But since kubeadm now added support for arm64 machines, I wanted to stay as close as possible to a "vanilla" k8s setup and Hetzner's Cloud ARM machines are really cheap. There wasn't much hesitation of doing just that. (This blog post is not sponsored by anyone but myself.)
If you want to, you can use any arm64/aarch64 hardware (but really any CPU architecture) you like and skip to the cloud-init part. I'll be going with the Cloud VMs since I don't have a Raspberry Pi cluster standing around.
First things first - setting up the VM
I will be using Debian 12 as the base OS, cri-o as the container runtime and kubeadm to bootstrap the cluster.
Let's start with the setup for the first VM. We're going to create a template that we can later just clone onto the other VMs.
To do that we will use the cloud-init option but you can use a tool like packer.io with the Hetzner Cloud Plugin to also build the Cloud VM.
In the Hetzner Cloud Panel, create a new project and select the newly created project.

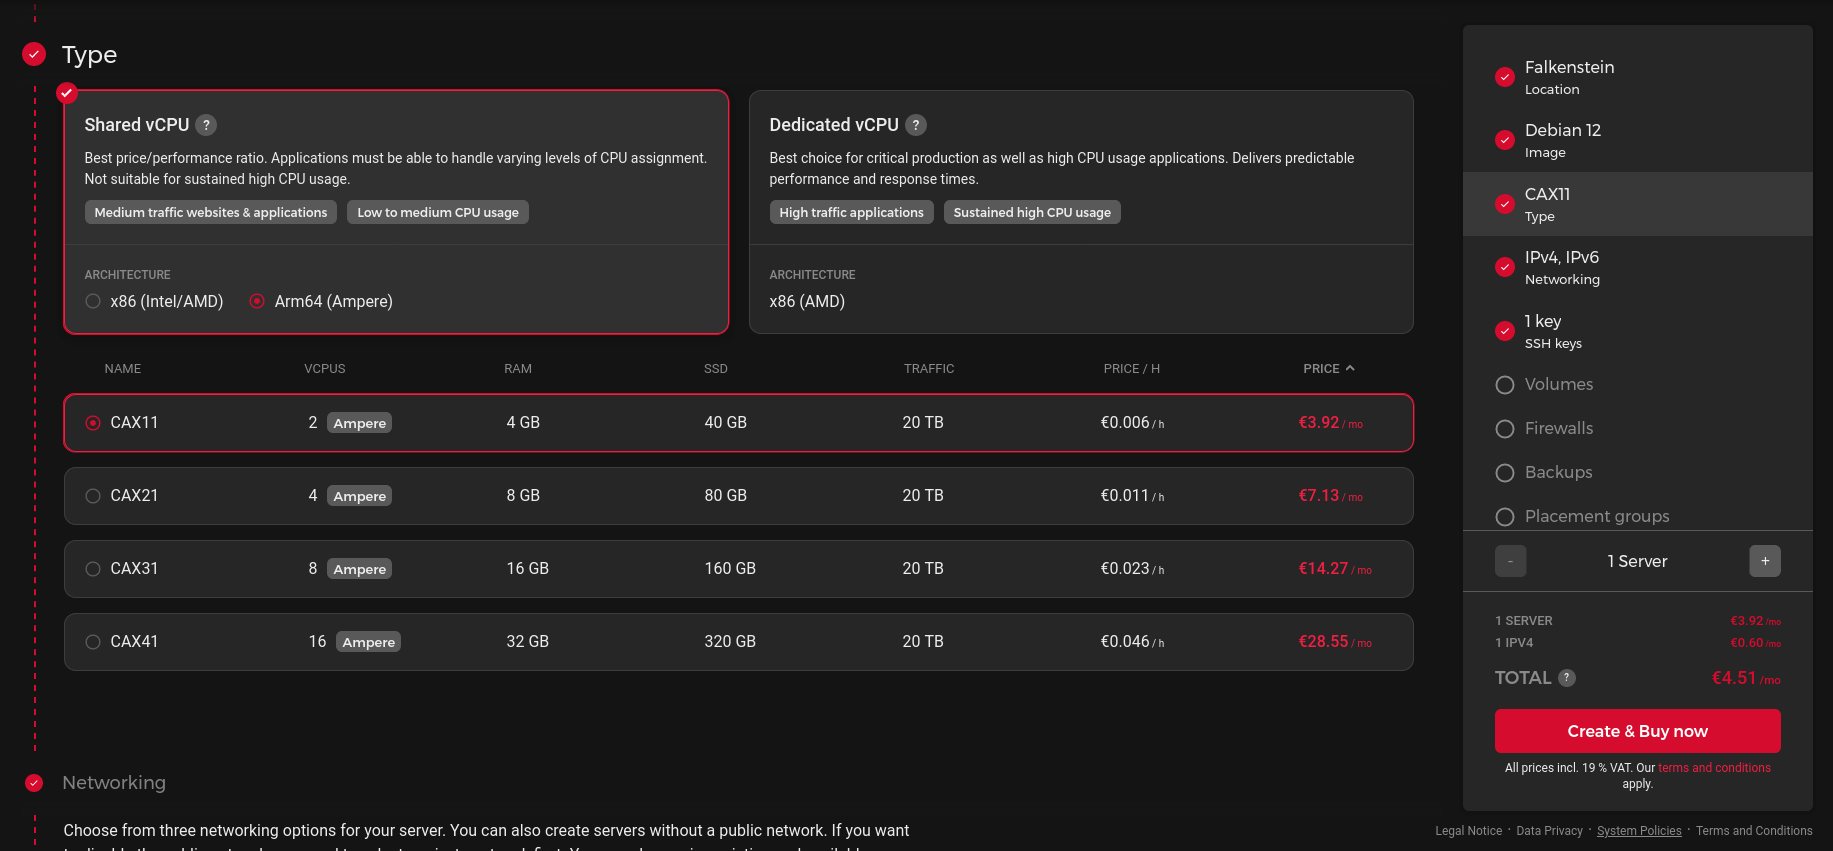
Create a new VM by clicking on "Add Server". Choose the location of the Server, select Debian 12 as base image and be sure that you selected arm64 as CPU type.
Follow the remaining steps and add your SSH key to access the machine later.
In the network section you can create a private network which the VMs can use later to communicate, to avoid using the public network which might expose traffic if you aren't using wireguard or similar to secure the inter node traffic.
In this example I'm going to use a 172.16.0.0/16 subnet to not interfere with the pod subnet used by the CNI.
Cloud-Init
Scroll down to the cloud-init part and copy, replace the SSH Key with your own key, paste the cloud-init config below and create the machine.
#cloud-config
users:
  - name: debian
    groups: sudo, wheel
    sudo: ALL=(ALL) NOPASSWD:ALL
    shell: /bin/bash
    ssh_authorized_keys:
      # replace with your key
      - ssh-ed25519 AAAAC3NzaC1lZDI1NTE5AAAAIH7TIhzQA3ijlmeBwP5CcriBP8M3CchPbC6DI301Nrc9
write_files:
  - path: /etc/ssh/sshd_config.d/port.conf
    content: |
      # SSHD configuration
      Port 1337
    permissions: '0600'
# mirror setup
apt:
  sources:
    kubernetes.list:
      source: "deb [signed-by=$KEY_FILE] https://pkgs.k8s.io/core:/stable:/v1.28/deb/ /"
      keyid: DE15B14486CD377B9E876E1A234654DA9A296436
      filename: kubernetes.list
    crio.list:
     source: "deb [signed-by=$KEY_FILE] https://download.opensuse.org/repositories/devel:/kubic:/libcontainers:/stable:/cri-o:/1.28/Debian_12/ /"
     keyid: 2472D6D0D2F66AF87ABA8DA34D64390375060AA4
     filename: crio.list
    kubic.list:
     source: "deb [signed-by=$KEY_FILE] https://download.opensuse.org/repositories/devel:/kubic:/libcontainers:/stable/Debian_12/ /"
     keyid: 2472D6D0D2F66AF87ABA8DA34D64390375060AA4
     filename: kubic.list
# install packages
package_update: true
packages:
    - [kubeadm, 1.28.4-1.1]
    - [kubelet, 1.28.4-1.1]
    - [kubectl, 1.28.4-1.1]
    - cri-o-runc
    - cri-o
runcmd:
    - |
      cat <<EOF | sudo tee /etc/modules-load.d/k8s.conf
      overlay
      br_netfilter
      EOF
    - |
      cat <<EOF | tee /etc/sysctl.d/k8s.conf
      net.bridge.bridge-nf-call-iptables  = 1
      net.bridge.bridge-nf-call-ip6tables = 1
      net.ipv4.ip_forward                 = 1
      EOF
    - sudo modprobe overlay
    - sudo modprobe br_netfilter
    - sudo sysctl --system
    - sudo systemctl enable --now crio
    - sudo rm -rf "/etc/cni/net.d/*"
cloud-init.yaml
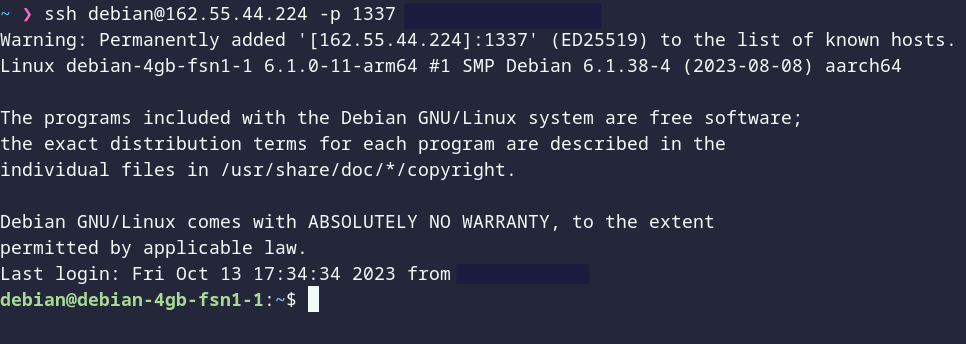
You then should have a running VM

And be able to connect to it via SSH
Now you can either create a snapshot from the VM and duplicate it or run the cloud-init steps again and create more Control Planes or Worker Nodes.
Bootstrapping the cluster
Once the machine is up, all necessary packages should be installed and you are ready to init the cluster.
I recommend you to also get a domain to assign to the cluster. I'll be using one of my domains to point to the Control Planes.
If you want to split the traffic to the API and ingress traffic, you should also get a load balancer which will round robin the incoming requests.
Use the command below to bootstrap the cluster.
Change the private IP (can be found on the VM overview) and cluster domain.
kubeadm init \
    --apiserver-advertise-address <private-ip> \
    --control-plane-endpoint <cluster.doma.in> \
    --cri-socket="unix:///var/run/crio/crio.sock" \
    --pod-network-cidr 10.0.0.0/8 \
    --service-cidr 10.96.0.0/16
Init Command
When the command finishes, it will print out the join commands to add more Worker Nodes. To add more Control Planes, you will have to upload the cluster certificates and get the certificate key. This will only be valid a couple of hours, to join more nodes later just repeat the steps again.
control-plane-1:~# kubeadm init phase upload-certs --upload-certs

[upload-certs] Storing the certificates in Secret "kubeadm-certs" in the "kube-system" Namespace
[upload-certs] Using certificate key:
5b964b50ee024b22f55a56b37166c19ad4efcfa9f4f2994f85d0e92913324934

control-plane-1:~# kubeadm token create --print-join-command

kubeadm join democluster.peek1e.dev:6443 --token wyqivo.8rt3c0zimpoij4le --discovery-token-ca-cert-hash sha256:61a7352e1594ec1e9068e05de0df54ba6f3bd8f4b6c72a70ace348cc7f45ce61
Certificate Key and Join Token
Grab generated command and append the certificate key to join another Control Plane.
kubeadm join democluster.peek1e.dev:6443 \
  --token wyqivo.8rt3c0zimpoij4le \
  --discovery-token-ca-cert-hash sha256:61a7352e1594ec1e9068e05de0df54ba6f3bd8f4b6c72a70ace348cc7f45ce61 \
  --control-plane \
  --certificate-key <certificate-key> \
  --apiserver-advertise-address <private-ip>
Control Plane Join Command
If you want to join a worker, just use the command printed by the kubeadm token create command, but make sure to append the --apiserver-advertise-address flag to use the private IP instead of the public address.
Once you have finished adding the other nodes, you can copy the /etc/kubernetes/admin.conf from the first control plane and run kubectl get nodes to list the nodes in the cluster which may look like this:
NAME                STATUS     ROLES           AGE   VERSION
debian-4gb-fsn1-3   NotReady   control-plane   82m   v1.28.2
debian-4gb-hel1-1   NotReady   control-plane   15m   v1.28.2
debian-4gb-hel1-2   NotReady   <none>          17s   v1.28.2
Done!
You can now proceed with setting up your CNI to bring up the coredns and make inter pod communication possible.
Afterword
In the past few weeks, where I have been running my arm cluster, I've ran across a reoccurring pattern; a lot of projects don't have arm64 ready images yet. So sometimes you have to build the images yourself and push them onto a container registry.
To name a few examples which were not ready to run yet:
- excalidraw
- zalando postgres operator's backup container
- my own containers :P
But lots of native Kubernetes components like Cilium, FluxCD and Velero have working and arm ready software, so you can look forward to a lot more arm computing happening in the future.

