Kubernetes application behind a VPN and with HTTPS domain


Some days ago I deployed a service on my Kubernetes cluster, but I didn't want the service to be publicly available. So I thought about protecting the service behind a VPN. That is an easy and common way to secure such applications. And I also wanted to access this service via a TLD domain, because nobody wants to memorize IP addresses. And because my brain can't stand websites running without SSL encryption, I had to use HTTPS for this local service.
To my surprise, I couldn't find a single write up related to this topic. That is why I wanted to share how I managed to secure applications behind a VPN that still run within my Kubernetes cluster and how I made these apps accessible via HTTPS.
Requirements
- K8s Cluster
- TLD Domain
- DNS provider capable of DNS challenges (e.g. Cloudflare)
- VPN (I bought a VPS from IONOS for 1€/month and installed Wireguard on it)
VPN Installation
This is very easy, because there are already open source scripts for exactly this purpose. I used this one and just left most settings default.
As always: Never run a script blindly on your server. Take a look at it and understand what it actually does.
Deploying the K8s Application
I am going to create a deployment with the application and a VPN sidecar container.
And because configmaps are always read only and the VPN clients needs write permissions for the Wireguard config file, I used an initContainer to create the Wireguard configuration.
apiVersion: apps/v1
kind: Deployment
metadata:
  name: filebrowser
spec:
  replicas: 1
  selector:
    matchLabels:
      kubernetes.io/app: filebrowser
  template:
    metadata:
      labels:
        kubernetes.io/app: filebrowser
      annotations:
        backup.velero.io/backup-volumes: "data"
    spec:
      initContainers:
        - name: init-wg-config
          image: alpine
          command: ["/bin/sh", "-c"]
          args:
            - |
              echo "[Interface]
              Address = 10.7.0.2/24
              DNS = 1.1.1.1, 1.0.0.1
              PrivateKey = $WG_PRIVATE_KEY

              [Peer]
              PublicKey = <your-public-key>
              PresharedKey = $WG_PRESHARED_KEY
              AllowedIPs = 0.0.0.0/0
              Endpoint = 1.2.3.4:12345
              PersistentKeepalive = 25" > /tmp/wg.conf && chmod 600 /tmp/wg.conf
          env:
            - name: WG_PRIVATE_KEY
              valueFrom:
                secretKeyRef:
                  name: filebrowser-wireguard-secret
                  key: private-key
            - name: WG_PRESHARED_KEY
              valueFrom:
                secretKeyRef:
                  name: filebrowser-wireguard-secret
                  key: preshared-key
          volumeMounts:
            - name: wg-confs
              mountPath: /tmp
      containers:
        - name: wireguard
          image: linuxserver/wireguard
          securityContext:
            privileged: true
            capabilities:
              add: ["NET_ADMIN"]
          env:
          - name: PUID
            value: "1000"
          - name: PGID
            value: "1000"
          - name: TZ
            value: "Europe/Berlin"
          volumeMounts:
          - name: wg-confs
            mountPath: /config/wg_confs
        - name: filebrowser
          image: filebrowser/filebrowser:s6
          ports:
            - containerPort: 8080
          volumeMounts:
            - name: data
              mountPath: /srv
            - name: db
              mountPath: /database
            - name: config
              mountPath: /config/settings.json
              subPath: settings.json
      volumes:
        - name: wg-confs
          emptyDir: {}
        - name: data
          persistentVolumeClaim:
            claimName: filebrowser-data
        - name: db
          persistentVolumeClaim:
            claimName: filebrowser-db
        - name: config
          configMap:
            name: filebrowser-config
Application
That is it for securing your application behind a VPN. You don't even need a service, because your are not going to use the internal cluster network. Simply connect to the VPN and enter the address (in my case http://10.7.0.2:8080) in the browser bar. You should see the homepage of your application now.
Running the App via HTTPS
OK. So far so good. Only the HTTPS domain is still missing.
First of all we will need a reverse proxy. I used Caddyserver because it is just simple and I love it. Unfortunately I couldn't use the base image, because we are going to make Cloudflare DNS challenges and therefore we need to have the Cloudflare DNS plugin installed. I stuck to this image for now. But I will create my own image in future, so that I don't have to rely on images from third parties.
Now I just need to add this reverse proxy to the VPN network. Same deployment file as before, only with the reverse proxy instead of the application.
apiVersion: apps/v1
kind: Deployment
metadata:
  name: caddyserver
spec:
  replicas: 1
  selector:
    matchLabels:
      kubernetes.io/app: caddyserver
  template:
    metadata:
      labels:
        kubernetes.io/app: caddyserver
    spec:
      initContainers:
        - name: init-wg-config
          image: alpine
          command: ["/bin/sh", "-c"]
          args:
            - |
              echo "[Interface]
              Address = 10.7.0.4/24
              DNS = 1.1.1.1, 1.0.0.1
              PrivateKey = $WG_PRIVATE_KEY

              [Peer]
              PublicKey = <your-public-key>
              PresharedKey = $WG_PRESHARED_KEY
              AllowedIPs = 0.0.0.0/0
              Endpoint = 1.2.3.4:12345
              PersistentKeepalive = 25" > /tmp/wg.conf && chmod 600 /tmp/wg.conf
          env:
            - name: WG_PRIVATE_KEY
              valueFrom:
                secretKeyRef:
                  name: caddyserver-wireguard-secret
                  key: private-key
            - name: WG_PRESHARED_KEY
              valueFrom:
                secretKeyRef:
                  name: caddyserver-wireguard-secret
                  key: preshared-key
          volumeMounts:
            - name: wg-confs
              mountPath: /tmp
      containers:
        - name: wireguard
          image: linuxserver/wireguard
          securityContext:
            privileged: true
            capabilities:
              add: ["NET_ADMIN"]
          env:
          - name: PUID
            value: "1000"
          - name: PGID
            value: "1000"
          - name: TZ
            value: "Europe/Berlin"
          volumeMounts:
          - name: wg-confs
            mountPath: /config/wg_confs
        - name: caddyserver
          image: ghcr.io/slothcroissant/caddy-cloudflaredns:v2.7.6
          ports:
            - containerPort: 80
            - containerPort: 443
          volumeMounts:
            - mountPath: /etc/caddy/Caddyfile
              name: caddyfile
              subPath: Caddyfile
            - mountPath: /data
              name: data
            - mountPath: /config
              name: config
      volumes:
        - name: wg-confs
          emptyDir: {}
        - name: caddyfile
          configMap:
            name: caddyfile
        - name: data
          persistentVolumeClaim:
            claimName: caddy-data
        - name: config
          persistentVolumeClaim:
            claimName: caddy-config
Reverse Proxy
The Caddyfile.
apiVersion: v1
kind: ConfigMap
metadata:
  name: caddyfile
data:
  Caddyfile: |
    your-doma.in, *.your-doma.in {
      tls your@mail.com {
          dns cloudflare <your-cloudflare-api-token>
      }

      @filebrowser host files.your-doma.in
      handle @filebrowser {
          reverse_proxy 10.7.0.2:8080
      }
    }
Caddyfile
And finally the DNS records.
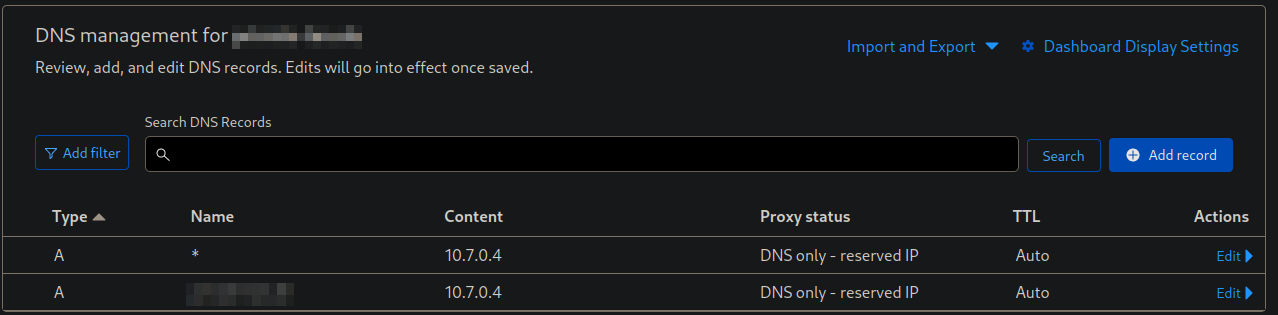
That is all. You should now be ready to go. The service should be accessible via your domain but still secured behind a VPN.

